Changing a coil takes about two minutes once you have done it a couple of times. The key is knowing whether your tank is top fill or bottom fill, because that decides whether you need to empty it first. Here is the whole process, plus the mistakes that cause leaks afterwards.
The short version
- Top fill tanks can be turned upside down and swapped without emptying.
- Push-fit coils pull straight out; screw-in coils twist off anticlockwise.
- Always prime the new coil and wait before you fire it.
- Check the O-rings are seated, or the tank may leak.
Know your tank before you start
Every tank has the same basic parts: a drip tip, a top cap where you fill, the glass with a central chimney, the coil head, an airflow ring and the 510 connection that screws onto your mod. The coil sits at the bottom of the chimney, held in the base.
Most modern tanks fill from the top, which makes coil changes easier because the liquid stays put when you flip the tank. Older or simpler designs fill from the bottom, so you have to empty them first.
Look at the anatomy below and find the coil head on your own tank before you take anything apart. Unscrewing the right section first saves a lot of sticky fingers.
- 1Drip tip
- 2Top cap and fill port
- 3Glass and chimney
- 4Coil head
- 5Airflow ring
- 6510 connection
- 7Mod: screen and buttons
- 8Battery bay
The swap, step by step
This method works for the vast majority of top fill sub-ohm and MTL tanks. Do it over a tissue or kitchen roll, and remove the tank from the mod first so you cannot press the fire button by accident.
If the old coil is stuck, it is usually because sugary residue has glued it in place. Wrap a bit of tissue around it for grip, or run the base under warm water for a few seconds before trying again. Never use pliers on the glass section.
Once the new coil is in, resist the temptation to fill and fire straight away. Priming is the step that decides whether the coil lasts.
- Remove from the modUnscrew the tank from the 510 connection so it cannot fire.
- Turn it upside downHold it drip tip down so the liquid stays away from the base.
- Unscrew the baseTwist off the base section that holds the coil.
- Pull the old coilPush-fit coils pull straight out; screw-in coils turn anticlockwise.
- Prime the new coilDrip liquid onto the exposed cotton and a few drops into the centre.
- Refit and waitFit the coil, screw the base back on, turn upright and wait 5 to 10 minutes.
Top fill or bottom fill?
If you are not sure how your tank fills, check where the liquid goes in. A sliding or hinged cap at the top means top fill. If the only way in is by unscrewing the base and pouring around the coil, it is bottom fill.
Bottom fill tanks must be emptied before a coil change, because removing the base opens the tank. Pour the old liquid back into its bottle if the coil was fine, or tip it away if it tasted burnt.
Choose your situation below for the exact approach. Either way, the priming step is identical.
Where does liquid go into your tank?
Flip the tank upside down and swap the coil without emptying. Keep it inverted until the base is back on.
Empty the tank completely first, swap the coil, prime it, then refill with the tank upside down.
Stopping leaks after a coil change
A tank that leaks right after a coil swap almost always has one of three problems: an O-ring that has slipped or torn, a coil not pushed or screwed fully home, or a base that is cross-threaded.
Check each O-ring sits flat in its groove before you reassemble. They can stick to the old coil and come away with it. Spare seals usually come in the box with the tank, and you can find more in our spare parts section.
Screw sections back gently. If a thread feels tight early, back it off and start again. Forcing it can strip the thread, and then no amount of tightening will seal it.
Make sure you have the right coil
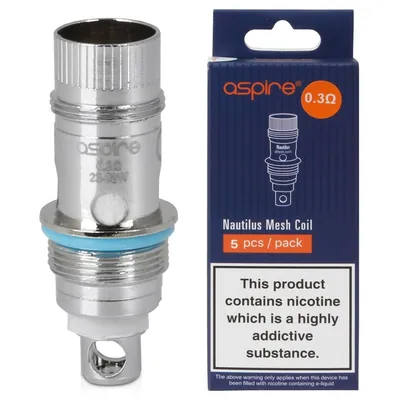
Coils are not universal. Each tank takes a specific series, and a coil from a different family will not fit, or worse, fits loosely and floods. Your tank manual or box names the compatible series.
Many tanks accept several resistances within the same family, which is useful. You could run a 0.6 ohm head for flavour on weekdays and try a lower one for more vapour at the weekend without changing anything else.
If you are not sure which coils your tank takes, our coil compatibility guide explains how to find out, and the coils section lists the families we stock.



Check what you learned
The single most common mistake after a coil change is not the swap itself but rushing what comes next. A new coil that is fitted perfectly and then fired before it has soaked will still taste burnt.
Build the habit of fitting the coil, filling the tank, then doing something else for ten minutes: make a drink, answer messages, anything. When you come back, take a couple of primer puffs and start at the bottom of the watt range.
For the full soaking routine, our guide to priming a coil goes step by step.
You have a top fill tank half full of liquid and want to change the coil. What do you do first?
Quick answers
Do I have to empty my tank to change the coil?
Not with a top fill tank. Turn it upside down, then unscrew the base. Bottom fill tanks must be emptied first.
How long after changing a coil can I vape?
Wait 5 to 10 minutes after priming and filling, longer for thick high VG liquids.
Why is my tank leaking after a coil change?
Usually a slipped O-ring, a coil not fully seated or a cross-threaded base. Take it apart and check each one.
Are vape coils universal?
No. Each tank takes a specific coil series. Check the manual or packaging for the compatible family.